


Getting started
Welcome to FlexiQuiz!
We've designed our software to be simple to use so that you can quickly and easily create almost any type of online assessment, test, exam or course. Thousands of individuals and organizations Worldwide already use our online quiz maker software to build millions of assessments for people to take anywhere, anytime.
We offer a choice of plans for you to pick from based on the type of quiz you want to build and budget requirements - our plans page provides more information about the tools, features, and options available.
This guide shows you how to get started by creating your first simple FlexiQuiz. However, we offer hundreds of features and tools so it's easy to add configuration options to make an online test that meets your requirements.
Creating your first quiz
- Create your FlexiQuiz account
- Update your account settings to meet your requirements. For example, change the time zone and name displayed on the footer of any email notifications.
-
Log into your account, and you'll land on your main dashboard.
- Your main dashboard lists all of the quizzes you create using your FlexiQuiz account. Every time you log in, you will land on this dashboard to easily access and edit your content. You can return to the dashboard at any time by pressing the blue Dashboard button on the top right of every page.
- Now press Create Quiz and enter the name for your new test, press Create quiz.
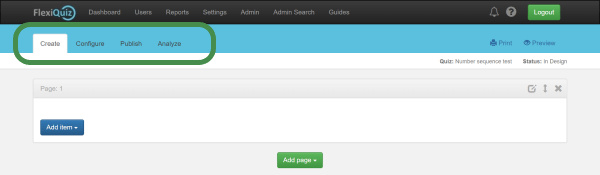
- You will land on the build screen - it's split into four sections for easy navigation.
- Create - from here; you can add and manage your content such as welcome information, questions or thank you pages.
- Configure - once you've added the questions, you can configure the test rules and creative style from hundreds of options.
- Publish - once you've designed your assessment and you're ready to share, this page will show you what your options are.
- Analyze- you will be able to view and manage the participants' responses from this page.
-
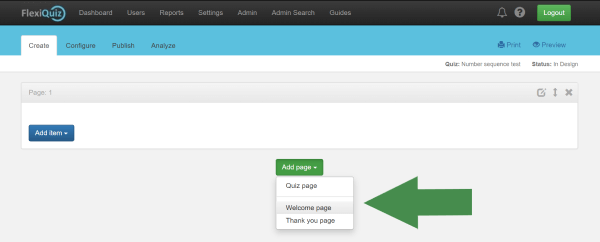
To start the build, choose what type of page you would like. Let's start with a Welcome screen - Press Add page and then select Welcome page
- Add any text or media that you would like displayed on the Welcome Page and press Save.
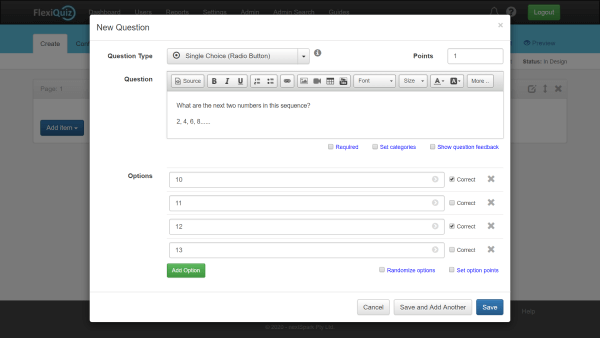
- Next, add a question - press Add item and select Question from the drop-down menu. This opens a question template.
- Choose your Question Type - just press the down arrow to open your list of options. In this example, I'm going to create a multiple choice question that has 2 correct options.
- Type your question text in the box.
-
Select any rules for the question by ticking the relevant box:
- Required - means respondents must answer.
- Set categories - your question will be added to your question bank. This option is only available for Premium or Enterprise members.
- Show question feedback - enables you to provide feedback to the participant based on their response.
- Add some answer options for respondents to choose from
- Tick the boxes next to the correct answer options.
-
Select the rules for the answer options:
- Randomize options - randomize the order that the answer options are shown to participants.
- Set option points - you can add or deduct points for each answer option, instead of awarding points for the total answer being correct.
- Press Save - your question is now saved. To move to your next question press Add item and then Question
-
To add new pages such as a Thank you page. Press Add page and select Thank you page from the drop-down menu.
- Top tip! You can view what your quiz looks like to respondents at any time by pressing Preview in the top right-hand corner.
- Select the Configure tab to configure your quiz. This includes adding time limits, color themes, adding notifications, setting certificates and much more.
- Select the Publish tab to open and share your test online. You can choose how you would like to share your quiz with participants and add a registration page,
- Your quiz is now live and available for your chosen audience to start completing.
Check out our video on YouTube to see how to create a single choice test.
Related guides
How to add a Welcome screen when creating an online test.
FlexiQuiz features for each plan - our full list of features available for you to make an online quiz.
Page types - different types of pages that you can use add to your online quiz.
How to create a vocabulary test
Question types:
Multiple choice, single response.
Multiple choice, multiple response.
Back