


Setting a maximum number of quiz attempts
FlexiQuiz lets you control how many times students can take your test.
You can also apply rules to manage retakes. For example, allowing learners to retry the test only if they receive a failing grade, or limiting retakes to show only the questions they answered incorrectly.
Defining the maximum number of times learners can take your quiz helps maintain fairness and manage the overall experience.
How to set the maximum number of quiz attempts
- To start, create and customize your quiz.
- Next, go to the Configure screen and scroll down to Maximum quiz attempts.
- In the box, enter the maximum number of times learners can take your quiz. Alternatively, if you leave the box blank, learners can take your quiz unlimited times.
- To only allow learners to retake the test if they get a fail grade, tick the box ‘can only retake if fail quiz’. Learn more about setting retakes for a fail grade only.
- To only show the questions learners get wrong, tick the 'only retake incorrect questions' box. Learn more about setting retrys for incorrect questions only.
- Then choose how you want to share your quiz. The experience for learners retaking a quiz is slightly different depending on how you share it.
- The learners' current quiz attempt will appear on your Analyze screen.

Ways to share your quiz with maximum quiz attempts set
#1. Share your test with a quiz link or QR code and a registration page
To limit how many times someone can access your quiz using a quiz link or QR code, you need to add a registration page with a mandatory unique field, such as an email address, staff ID, or surname.
The unique field ensures that learners cannot register multiple times using the same information.
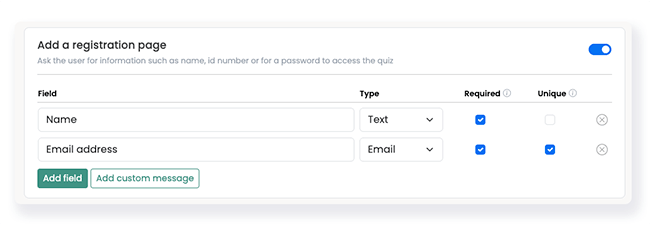
Learn more about adding a registration page with a mandatory unique field.
The learner experience:
- Learners complete the registration page before they can start the quiz.
- They then take and submit the quiz.
- After submitting, they may see a button to retake the quiz, depending on your settings.
- Learners cannot close the quiz and return later to use additional attempts.
To allow learners to return and continue the quiz later, you’ll need to share it using email invitations or through a Respondent Portal.
Important! Your registration page must include a unique field in order to prevent users from registering with the same data multiple times.
#2. Share your quiz by sending email invitations
When you send an email invitation, it includes a unique link that learners can use to access the quiz.
Learners can click this link at any time to open the quiz. If they have not yet completed it, the link will take them directly to the quiz.
If they have already completed and submitted the quiz, the link will open their results page. If multiple attempts are allowed, they can start another attempt by clicking the Retake Quiz button.
#3. Assign your quiz to a learner's Respondent portal
A Respondent Portal is an account that allows learners to log in and access all the learning materials assigned to them.
Once a learner completes and submits a quiz, the next time they access it through the Respondent Portal they will see their results page.
If multiple attempts are allowed, a Retake Quiz button will appear on the results page, allowing them to retake the quiz.
Find out how to assign a quiz to a Respondent Portal.
#4. Share your test with a quiz link and no registration page
This option allows you to set the maximum number of attempts from a browser.
However, the FlexiQuiz system cannot determine whether the same person uses a different browser or whether different respondents use the same browser.
To set a maximum number of quiz attempts using the browser:
- Build your quiz and set the number of allowed quiz attempts.
- On the Configure screen, tick the Use browser attempts tracker box.
- When you are ready to share your online quiz, go to the Publish tab, open your quiz, and choose how you want to share it with your learners.
Frequently asked questions
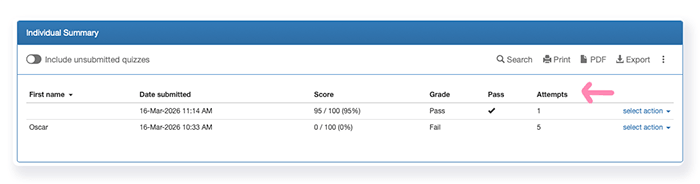
Can I view how many times a student has taken the test?
Yes, you can view the number of a times a learner takes your quiz on your Analyze screen.
- From the Analyze screen, click on the 3 dots on the top right of the table.
- Select Configure columns from the drop-down menu.
- Tick the box Attempts.
The table will now show the number of attempts each user takes.
Can I view the responses from previous attempts?
Yes, you can view the previous responses.
- Go to your Analyze screen and select the Individual Summary report type.
- Scroll down the table to find the learner results you want to view.
- Click on select action.
- Choose previous attempts from the drop-down menu. A list of all user attempts will appear.
- Click view next to the relevant attempt.
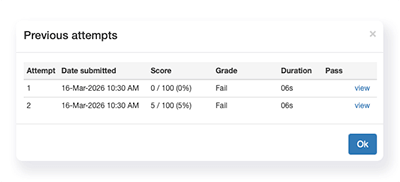
A list of all the questions with learner responses will appear. You can download the responses in a PDF format.
Can I customize the Retake button on the Results screen?
If you have an Essentials plan or above, you can customize the button text and add a message to the Results screen.
To customize the button text:
- Go to the Theme screen.
- Select the Messages tab.
- Scroll down the page to Retake Quiz.
- You can delete the existing text and add your own in any language.
To customize the text on the learner's Results page:
- Select Results from the left-hand menu.
- Scroll down the page and tick the box Pass/fail message.
- Enter your text in the box.
Can I allow some learners (not everyone) to have extra quiz attempts?
Yes. You can grant additional quiz attempts to single or specific learners if they have already used all of their available attempts.
To allocate extra attempts:
- Go to the Analyze screen and find the relevant learner.
- Click select action. If the learner has used all of their allowable attempts, the option add extra attempts will appear.
- Click add extra attempts.
- A pop-up will appear to add the extra attempts. Enter the number of extra attempts that the learner is allowed.
- Click Save.
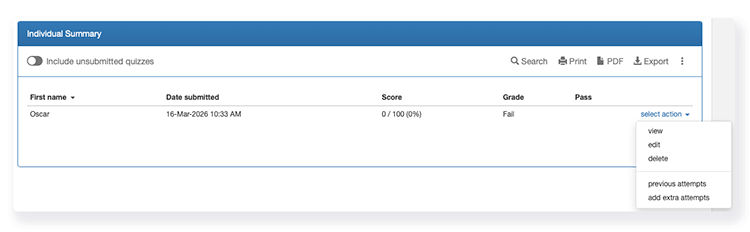
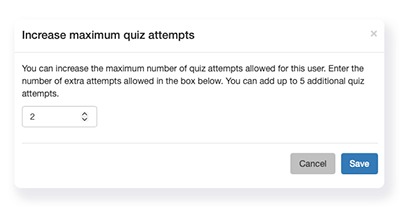
The learner will now be able to take the quiz extra times.
Learn more about adding extra attempts for a learner.
Relevant help guides
Learn more about Respondent portals
Redircting learners to the next quiz based on their grade
Ways to prevent cheating on an exam
Back