


Sending quizzes via email invitations
The email invitation option allows you to send customized emails inviting people to take your quiz, follow-up reminders, and track who has responded.
You can send customized email invitations directly from your FlexiQuiz account, complete with a unique link that allows learners to access your quiz. If you have an Enterprise or Enterprise+ plan, you can also send invitations from your email address using our SMTP integration.
How to email invitations for learners to take your quiz
- First, create and configure your quiz, then click the Publish tab to choose how and when to share it.
- Then choose when you want to publish your quiz.
- Click the Email invitations box to proceed.
- To add a registration page, click on the toggle. The list of registration fields will appear - you can customize the fields in any language.
- Then view and customize the text for your email. Press the down arrow to view and edit the email. You can customize the text in the subject line and email message in any language.
- Scroll down to Email invitations and click Add emails. A window will appear that allows you to add the email address for each user you want to view your test.
- Then, enter the email address for your users. The limits for the number of email invites you can send depend on your plan type.
- Click Send emails to send the quiz invitations.
- If you schedule the quiz to open later, a window will pop up to ask if you want to send the email invitation now or when the quiz opens.
- Click Send to send the email invitation now.
- Click Send later to allow the email invitation to be sent when the quiz is scheduled to open.
To publish the quiz immediately, click Publish quiz.
To schedule the quiz to open at a later time, click the Automatic Schedule toggle and enter the required open and close times.
Alternatively, you can manually publish the quiz at any time.
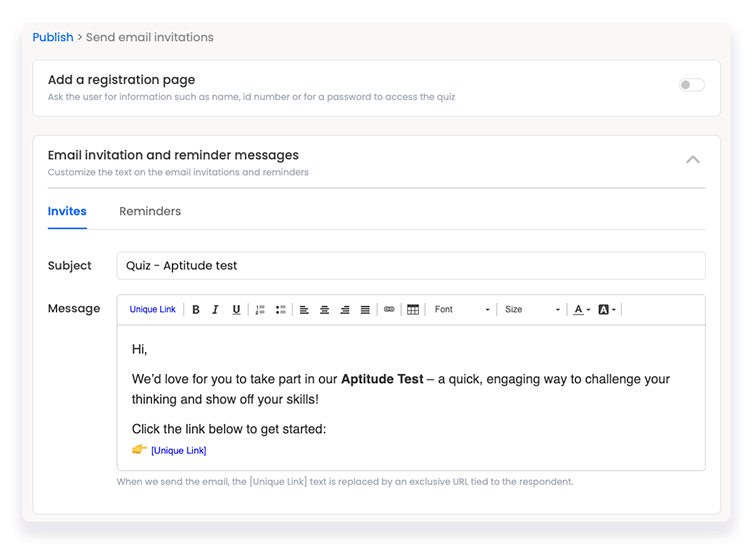
Important! Do not remove the Unique Link from the email message, as it serves as a placeholder for a unique URL that each learner can use to access their quiz. You can track progress and results using the Unique Link.
How to track responses
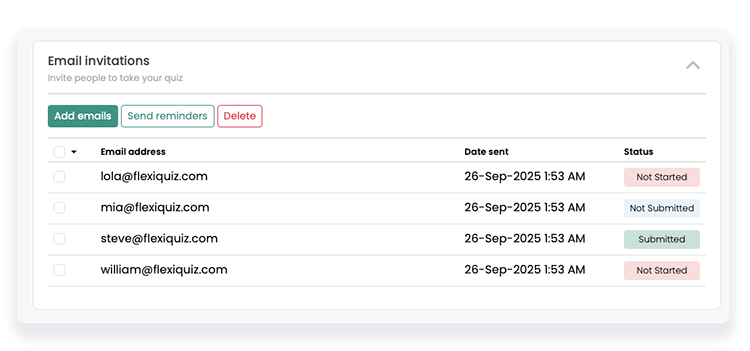
Your Publish screen saves a list of email invitations with the date sent and the users' quiz progress.
Definitions of each status:
Not Started: The quiz-taker has been sent an invitation but has yet to start the quiz.
Not Submitted: The quiz-taker has started the test but has yet to submit it.
Submitted: The test-taker has submitted the quiz at least once and the results are available on your analyze dashboard.
You can view responses from learners on the Analyze screen.
Click Include unsubmitted quizzes to view users who were sent an email invitation but still need to submit their current response.
How to remind people to take the quiz
Sometimes, people need reminders to complete their online test, or you might want to share some extra information.
With FlexiQuiz, you can automatically send an email reminder if quiz-takers have not submitted their quiz after a set number of days. Learn more about automated reminders.
Alternatively, you can manually follow up with quiz-takers at any time by following these steps:
- Go to the Publish screen and make sure the quiz is open.
- Then, click on the Email invitations box.
- Scroll down the page and click the down arrow next to Email invitation and reminder messages. Now, you can customize the subject line and email in any language.
- Next, scroll down to the Email invitations section. Select each user that you want to send an email to.
- Click the Send reminders button. The system will send your email reminder, and the Date Sent column will now display the date the reminder is emailed.
Important! Keep the Unique Link as this gives your quiz-takers access to the test.
How to remove a user
You can delete learners from your email invitation list at any time.
If you delete the learner's email address, they will be unable to access your content, and the system will automatically delete any submitted responses.
To delete a learner:
- From the Publish tab, click on the Email invitations box.
- Then scroll down the page to your Email invitations list.
- Tick the box next to each email address that you want to delete.
- Then click the Delete button.
- A message will appear to confirm that you want to remove the email invitation and any results on the analyze screen. Click delete to remove the learner.
Important! If you choose to delete the email address from the Email to list, all data is deleted and cannot be recovered.
Frequently asked questions:
What happens if the user does not receive the invitation?
Please allow up to one hour for the user to receive the email.
If they still have not received their invitation, they need to check their junk or spam folders. If they cannot locate their invitation, you can contact us for further information.
You can also share the unique quiz link contained within the email invitation. To access the link, follow these steps:
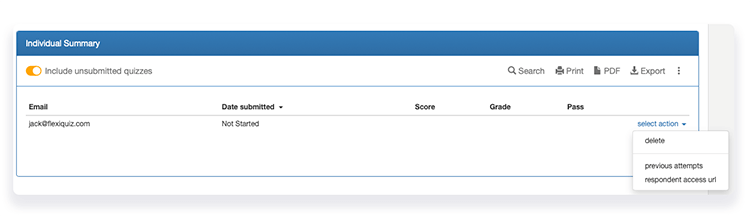
- Go to your Analyze screen and press the toggle Include unsubmitted quizzes.
- Now, find the user and click select action.
- Select respondent access URL from the drop-down menu. A window pops up with a unique URL. Copy the URL and press Ok to close the window.
- You can share this unique URL with your learners to access the quiz. This URL is the same link as on their email invitation, preventing duplication of information. The link is only available if the learner has not submitted the quiz.
What are the benefits of sharing a quiz with an email invitation?
Sharing a quiz through an email invitation is ideal when you know exactly who should take the quiz. Benefits include:
- Keeps your quiz private by allowing access only to people who receive the email invitation.
- Lets learners return to and retake the quiz up to the maximum number of attempts you set.
- Tracks when learners start and submit their quiz.
- Identifies learners automatically through their email address, reducing the need for additional identification details.
What is the maximum number of email invitations I can send each day?
The number of emails you can send depends on your plan type.
- Free: 0 per day
- Essentials: 200 per day
- Premium: 1,000 per day
- Enterprise: 3,000 per day
- Enterprise+: Contact us to discuss your needs
Relevant help guides:
How to set a maximum number of quiz attempts
How to email learners with quiz results
All ways to share your online quiz
Blog: Our top automation features to save you time
Back