


Enable learners to self-register for a group of quizzes
With FlexiQuiz, Admins can enable learners to sign up or self-register for quizzes that are part of a Group.
If self-registration is enabled, learners complete a form to set up a Respondent portal assigned to the Group. Learners accessing their Respondent portal can view and take all quizzes or courses assigned to the Group.
How to set up a registration page to enable learners to self-register for a quiz
- To start, you need to create a Group that learners will self-register for. From your main FlexiQuiz dashboard, click Groups on the top header - your group's management screen will appear.
- From here, you can add a new group or edit an existing group. So, either click Add group or click on one of your existing groups.
- Your Groups profile screen appears, where you can add a name for the group and assign any quizzes.
-
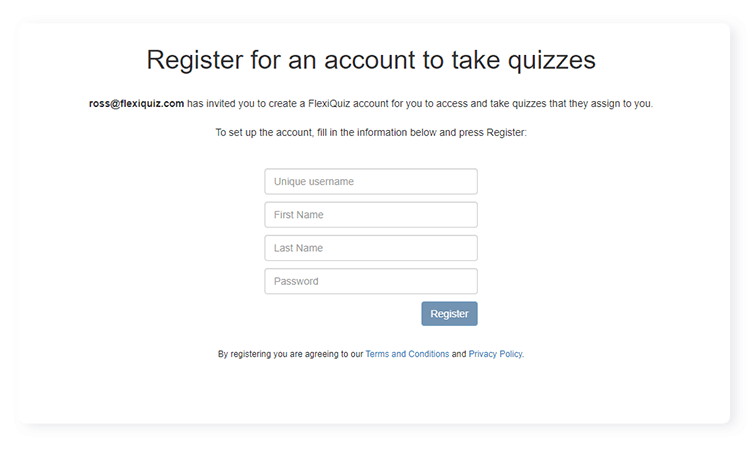
Now select the Self-registration tab and tick the box Allow self-registration. A landing page is automatically generated that you can share with learners to sign up for the group. This image shows an example of the standard landing page before any customization.
- Next, you can choose to customize the landing page and learner experience.
- To personalize the landing page URL, click the green Customize URL button and enter your new text.
- To customize the text on the landing page, delete the existing copy and add your own. You can add your text in any language so that it's easy for learners to understand the next steps.
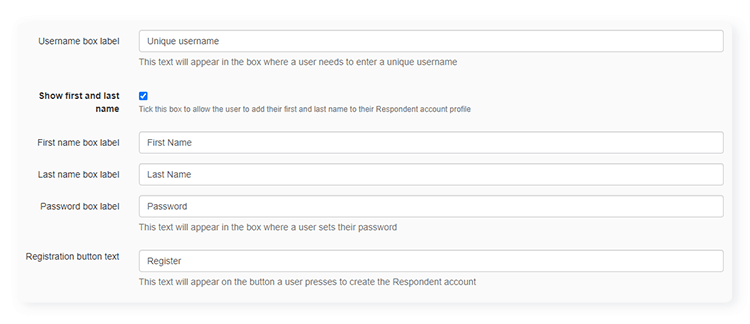
- The landing page contains boxes where learners must enter a unique username and a secure password. You can customize the text in the boxes by editing the words in the Unique username and Password fields.
-
If you want to capture the learner's first and last names, tick the box Show first and last name. Two additional boxes appear and you can customize the guiding text in these boxes.
Top tip! The first and last name fields map to any certificates the learner might qualify for.
- To customize the registration button, enter your text in the Register box.
-
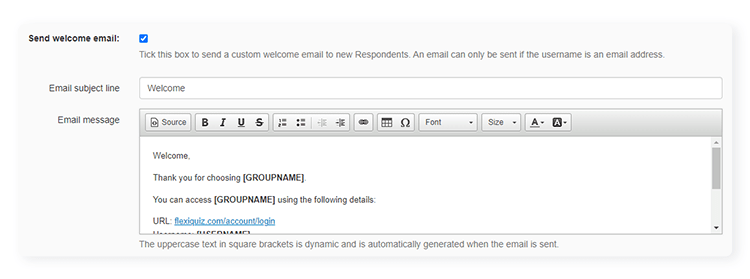
Next, choose if you want to send a welcome email. The welcome email is only sent if the user provides a valid email address. To send a welcome email, tick the box, Send welcome email. You can now customize the subject line and body of the email.
- Finally, share the registration page URL with your learners.
Frequently asked questions
How do I know who has registered for the group?
You can track and manage who joins the group from your groups profile page.
Can I stop Respondents from accessing my content in the group?
You can delete or suspend Respondent portals. To manage Respondent portals, go to your user management screen.
Can I validate users before they join the group?
If you want to validate users before they access your learning content, you can create a group with a single quiz that includes questions to check credentials. Once the user answers the questions, you can manually assign them to a new group.
Can users register for a single quiz?
There are a couple of options for learners to register to take a single quiz:
A. You can add a custom registration page to the start of the quiz.
B. Alternatively, you can allow learners to self-register for a Respondent portal. This option allows you to assign additional quizzes to the learner at a later time.
Relevant help guides:
How to customize a Respondent portal
How to assign a quiz to a Group
Blog:Creating an engaging online course
Back