


Sharing feedback on quiz questions
Providing quality feedback to learners is important because it reinforces their knowledge and highlights areas for improvement.
With FlexiQuiz, you can share custom feedback during or after a quiz based on whether learners answer correctly or incorrectly.
Feedback can be delivered in any language and enhanced with images, GIFs, audio, and video to create a more engaging, interactive learning experience.
How to add feedback to your quiz questions - New Create screen 2026!
- Start by adding our question.
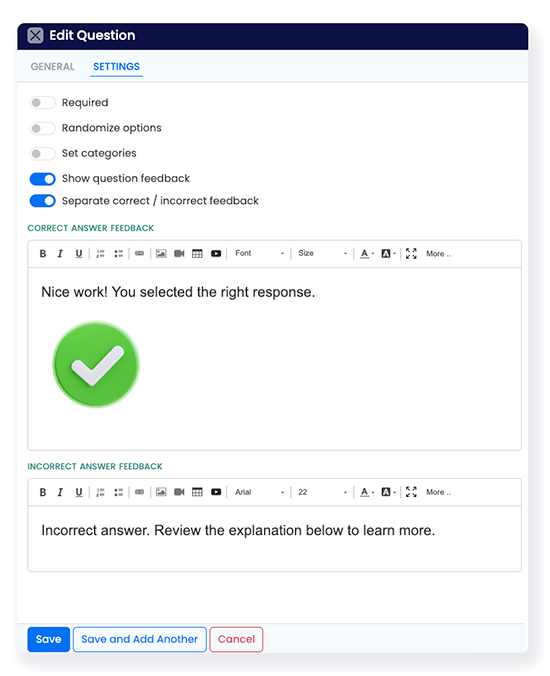
- From the question editor screen, select the Settings tab.
- Click the toggle Show question feedback.
- Then choose whether to give everyone the same feedback or split it based on right or wrong answers. To give learners different feedback, click Separate correct / incorrect feedback.
- Then enter your comments in the
Feedback box. - Depending on your plan type, you can attach documents for learners to download and add images, GIFs, videos, and audio.
- Click save to add the question and your feedback to the quiz.
How to add feedback to your quiz questions - Legacy system
- To start, create a new Classic quiz or edit an existing one.
- Now, add or edit your quiz question.
- From the question editor, tick the box Show question feedback. A window will appear, allowing you to add question feedback that applies to all learners.
- To share feedback based on a right or wrong answer, tick the box Separate correct / incorrect feedback. Two windows will appear, allowing you to add feedback based on a right or wrong response.
- Then, enter your feedback in the relevant box. You can add GIFs, images, videos or audio to engage and motivate students.
- Click Save to add the question and feedback to your quiz.
- You can continue to add feedback to all or some of the quiz questions.
Ways to share question feedback with your learners
You can share feedback with learners as they take the test, at the end of the quiz, or as part of the PDF when emailing results.
Sharing feedback during the quiz
- From the Configure screen, select Results on the left-hand menu.
- Now tick the box Show answers during quiz.
- The FlexiQuiz system will automatically score questions at the end of each page and share the relevant feedback.
- From the Configure screen, select Results on the left-hand menu.
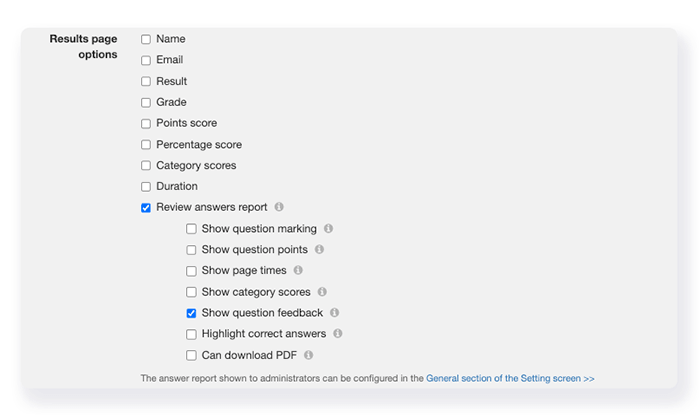
- Tick the box Show results page.
- Now scroll down to the Results page options section and tick Review answers report and Show question feedback.
- From the Configure screen, select Notifications on the left-hand menu.
- Now scroll down to Email respondent and tick the box. Learn more about setting up email notifications to share quiz results.
- Tick the box: Include PDF of responses.
- To add the feedback to the PDF, select Results from the left-hand menu.
- Scroll down to Review answers report and tick the box Show question feedback.
- Feedback for 'file upload' and 'free format' questions cannot be split based on a right or wrong response, as the system cannot auto-score the answers.
- To show feedback for correct answers, the entire question must be correct. Some questions, such as matching, checkboxes (multiple responses), and fill-in-the-blank, may have several parts to the answers. All elements need to be correct.

Try this quiz to view feedback during the quiz.
Sharing quiz feedback on the Results screen
You can share feedback as part of a PDF containing all quiz questions and feedback next to each question.
Sharing feedback on email notifications
You can share feedback as part of the answers report that learners can download.
Top tips!
Frequently asked questions
Can I share detailed feedback based on the learner's grade for the whole quiz?
You can use our grade-based redirect feature to share detailed feedback. Learn more about sharing detailed feedback based on grades.
Relevant help guides:
Importing questions and feedback with our Excel spreadsheet
How to add audio to the feedback
How to add videos to your feedback
How to add images to your feedback
Back