


Logic-based redirects
Logic-based redirects allow you to automatically send the learner to the next quiz or learning activity based on their previous responses.
With FlexiQuiz, you can use logic-based redirects to allow learners to choose their next test. You can base their options on the language of the test, location, department, or other preferences.
How to set up logic-based redirects
This guide shows you how to create a quiz that let's learners select their next activity.
Stage 1: Make the various quizzes people can pick
- To start, make the quizzes or learning activities that students choose from. For example, you make multiple quizzes in different languages.
Learn how to make a quiz.
Stage 2: Build the lead quiz
- Then, create the first or lead quiz that you will give learners, with the list of options for picking the next quiz. To make the quiz, go to your main dashboard, click +Create and enter a name for the quiz.
- You can now add your content to the quiz editor page. You can add a welcome page with instructions for the learners or include the relevant information as part of the question.
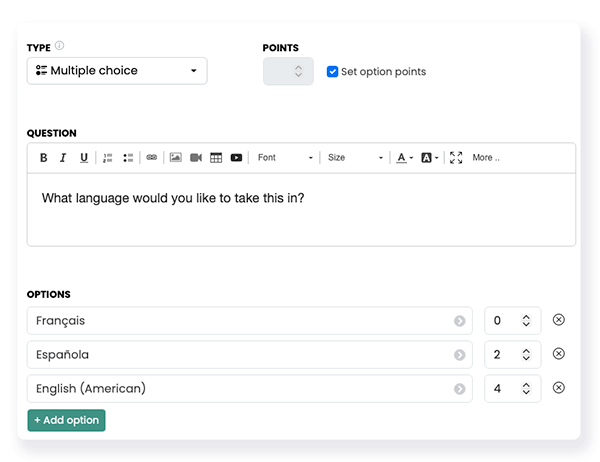
- Now, create your question. Click Add Item and pick Question from the drop-down menu.
- Next to Question Type, select Single Choice (radio button), Multiple-Choice or Picture Choice.
- Add your text to the question box, such as "What language would you like to complete this exam in?" Depending on your plan type, you can add images, video and audio to support your message.
- In the Options boxes, list all choices learners can pick from.
- Then tick the box set option points. Boxes will appear next to each answer option. Enter a number in each box; this number will be used to redirect learners to the relevant quiz.
- Press Save to add the question to your quiz.
Top tip! Tick the box required to ensure participants can't move to the following quiz without picking an option.
Stage 3: Set the logic
This stage will connect each answer option to the relevant quiz.
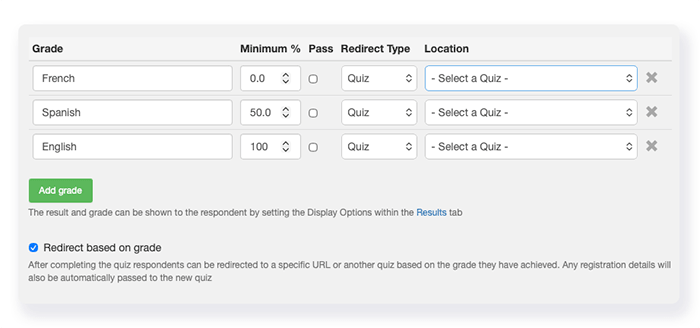
- Go to the Configure tab and select Grading from the left-hand menu. The grading screen will appear.
- Scroll down the page and tick the box Redirect based on grade. The grades box will now include the redirect type and the location.
- You now need to map each answer option to the relevant quiz. Start by entering the name for each answer option in the Grade column.
- Now, convert the number of points you awarded each answer option to a percentage of the total available points.
- Once you have the percentages, add the numbers to the Minimum % column.
- Then go to the Redirect Type column and choose Quiz from the drop-down menu.
- Finally, go to the Location column, click the down arrow and pick the relevant quiz.
For example, on the quiz editor screen, I gave each language the following number of points:
French: 0 points
Spanish: 2 points
English: 4 points
So, the maximum number of points available is 4.
The calculations are:
French: 0 / 4 = 0%
Spanish: 2 / 4 = 50%
English: 4 / 4 = 100%
Stage 4: Customize the learner experience
For a seamless learner experience you can remove the results screen.
- From the Configure screen, select Results on the left-hand menu.
- Now untick the box Show results screen.
Stage 5: Share the lead quiz with learners
- Go to the Publish screen.
- Click Publish to open the lead quiz.
- Then, pick how you want to share the quiz with your audience.
Learn more about ways to share your quiz.
The learner experience
Take this sample quiz to see how learners can select which quiz they want to take.
Relevant help guides:
How to customize or remove the results page
Redirecting all test-takers from the results page
Blogs:
Building a learning path with quizzes, tests, and assessments
Creating a quiz in any language
Back